


If you’ve ever wanted to make your own dried flower projects but didn’t know where to start, our dried flower kit can turn you into your own florist! This kit - one full of garden blooms and grasses - will help you dive into the world of floristry. It’s perfect for small scale crafts like bouquets, petite arrangements, and festive boutonnieres. Take a look at our guide below for project ideas, detailed steps, and suggested materials for creating your own unique, long-lasting dried flower creation.
We’d love to see your final creations, so please snap a photo and tag us on Instagram! Find us @roxannesdriedflowers
Dried Flower Arrangement (makes one small arrangement or 2-4 bud vases)

- Choose a vessel around 3x3" or 4x4".
- Lay out your material and clean your stems of breakage and debris. Some stems you may want to edit by cutting stems into multiple pieces, such as the pampas and rhodanthe.
- Tape a grid with clear floral tape across the top of the vessel. Be sure to wrap a piece around the rim of the container to secure the ends of your grid pieces. The grid will give you a structure to build upon, helping hold your stems as you design.
- Begin placing your stems; be sure to keep them clean of foliage and broken pieces.
- Start with your grasses: the wheat and pampas. Let them create an outline of the general shape you would like to create. Leave a few stems for the end.
- Place each stem in at an angle, each extending slightly from the center of the arrangement outwards. This will help create a natural look.
- Next, add your Rhodanthe (pink flowers) and Nigella. These will act as your focals. Use them to fill in holes and create interest.
- Fill any holes with the remaining wheat and/or pampas.
Tips:
-Cut stems at varying lengths to create depth;
-Spin your design periodically and work all sides to make sure your design stays even;
-Step back once in a while to see how the design is coming along;
-Be gentle with the stems;
-Always cut little by little as you can always cut more.
Material suggestions:
Learn How to Use a Flower Frog (kit makes 2-4)

Using flower frogs or kenzan is usually reserved for fleshy, thicker stems; however, by making small bunches of thin stems you can create a structure for the pins to hold on to and give the stems structure. This grouping method is also similar to the principles of Ikebana, where you keep like stems grouped as if growing from the ground as a single plant.
- Make small bunches of the individual elements in the kit: 1-3 of each material depending on your design.
- Be sure to keep stems at varying lengths and grouped in a natural way, avoid stiff-looking stems.
- Once you are happy with the bunch, use a small rubber band (or tape) to tightly secure at the bottom. Cut the stems just under the band - about a quarter to half inch.
- Place your bunch on the flower frog.
- Do this for the rest of your materials.
- Keep in mind your grasses (wheat and pampas) may look better towards the back of the frog for height and a natural sense of leaves and grasses extending beyond the flower heads; whereas the nigella and rhodanthe may look better cut at a shorter length towards the front for better visibility.
Material suggestions:
-mini rubber band or clear floral tape
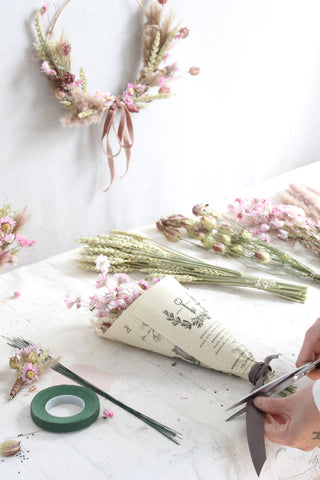
Make a Dried Flower Wreath (makes 1 wreath)

You can use any kind of wreath base with this kit. We recommend one with a diameter of 6-10". Grapevine, metal, twisted curly willow, or wired twigs from your backyard could all work as a base!
- Decide on your design: will it be all around your base, just one side, or a small accent point?
- Make small mixed bunches of your materials keeping in mind your final design. For this example we made four bunches. Use floral tape, binding wire, or jute cord to secure your bunches. Save a few stems of material for later.
- Keep some stems longer for a wispier look or shorter for a tighter, compact look.
- Use jute, tape, or wire to secure your bunches to the base. Tie around the stems and possibly also at a point higher on the stems to help them naturally curve around your base and add extra support. For our example, we started from the middle outward.
- Place the following bunch over where the stems of the last bunch were tied so it hides your mechanics.
- Use your saved stems to fill in any holes or even glue in the nigella or rhodanthe stems to add more focal points in desired areas.
- Tie a bow if desired. You can use your tie point to hide stems and/or mechanics.
Material suggestions:
-wreath base
-tape, binding wire, and/or jute cord
-glue (hot glue or floral glue)
DIY Dried Flower Boutonniere (8-15 depending on design)

This is a great option for the crafty bride and groom who wants to make their own boutonnieres. This kit would also work for pinned and wrist corsages!
- Decide on a design, we like to make the grooms a little different if you are making boutonnieres for a wedding. You could also make all the boutonnieres unique with their own design. The choice is yours. Be sure to only include 5-10 stems (depending on thickness), also be sure your boutonnieres don't get too large. We generally like to keep ours around 4 1/2" or under.
- Lay out your material. Choose the best heads of the rhodanthe and nigella to act as your focals; you will only need a few of them per boutonniere. Edit stems as necessary such as cutting the pampas into multiple small pieces or trimming the top of wheat to create appropriate sized stems to work with.
- Begin creating by using the wheat and pampas to form your general shape.
- Place each stem one or two at a time and secure them with floral tape. In our example, we have stems peaking out a little below, about 1/2". Make the floral tape extend about 1-1 1/2" down the stems, having about 1 1/2-3/4" total length of stem.
- Continue this process, adding and taping stems.
- If you have glue available, gluing in some elements once you have a base made is also an option.
- Try to keep your tape even in thickness and be sure not to add too much, as it will make your stems look bulky and become difficult to wrap.
- Once you are happy with the design, use ribbon to cover the floral tape.
- Be sure to have pins ready with each boutonniere! We like to give 2 per boutonniere and stick them in the side.
Material suggestions:
-glue (hot glue or floral glue)
-pins
DIY Dried Flower Bouquet
- Lay out your material and clean your stems of breakage and debris. Some stems you may want to edit by cutting stems into multiple pieces, such as the pampas and rhodanthe.
- Begin by arranging the wheat in your hand. Use your non-dominant hand to hold the bouquet as you arrange.
- Try to place each stem at an angle to fight the look of the stems looking too stiff. This will also make it easier to pull and place stems if they are all following a placement pattern.
- Next add your pampas, followed by your rhodanthe, and then nigella. We recommend this order to work up to the stems with the largest head and focal value as well as considering the fragility of certain stems, such as the nigella and rhodanthe.
- Turn your bouquet as you work if you want to make an "all around" design.
- Once you are happy with your design, use jute cord or tape to secure the stems, carefully tying around your hand holding the stems.
- Trim your stems giving them a clean, even look. Be sure to keep the vase you wish to use in mind. Keep stems long if giving as a gift.
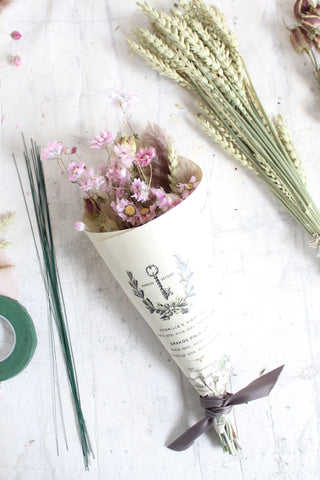
- If you are giving your bouquet away, wrapping your flowers is wise for both beauty and protection.
- Cut a piece of sturdy paper in a rectangle shape and place it horizontally in front of you on a flat surface.
- Place the bouquet at an angle in the top left corner of the paper. Ensure none of the heads stick out from the edge of the top of the paper.
- The paper should come down right around where you tied your bouquet.
- Start from the left side of the paper, fold it over the bouquet and continue rolling the bouquet at the angle it was placed.
- You should be finished with a nice "V" shape in the center of the bouquet which highlights the flowers within, but also provides protection on the sides.
- Use your hand to secure the base of the paper around where you tied the bouquet, use a ribbon to tie the paper to the bouquet.
Material suggestions: